使用 acme.sh 自动化维护证书
🔗 https://github.com/acmesh-official/acme.sh
安装和更新
安装
安装 socat
# RHEL
$ dnf install socat
安装 acme.sh
一般情况下, 这个地址不会安装成功, 但是可以使用 github host 地址 : 521xueweihan/GitHub520
警告
此处密钥信息请妥善留存, 请勿泄露
$ curl https://get.acme.sh | sh -s email=my@example.com⚠️
不推荐使用未知的源来进行安装, 这种工具可能会对你提供的KEY进行改动, 从而对你的域名自动加入违法解析, 详情见 域名被污染的风险以及风险处理
如果在国内推荐使用
$ git clone https://gitee.com/neilpang/acme.sh.git
$ cd acme.sh
$ ./acme.sh --install -m my@example.com
在安装完毕之后需要重新打开终端来重新执行后续的命令, 否则会出现 bash: acme.sh: command not found 这个错误提示
安装完毕后会安装上了自动执行任务
11 0 * * * "/root/.acme.sh"/acme.sh --cron --home "/root/.acme.sh" > /dev/null更新
acme.sh 在持续开发中, 推荐使用最新的代码
更新
acme.sh --upgrade启用自动更新
acme.sh --upgrade --auto-upgrade禁用自动更新
acme.sh --upgrade --auto-upgrade 0证书
自动签发
使用 dnspod 的 KEY 来进行生成, 在这里不用单独的设置环境变量
export DP_Id="444***"
export DP_Key="167223***066c45989e"
警告
此处密钥信息请妥善留存, 请勿泄露
DP_Id 和 DP_Key 将保存在 ~/.acme.sh/account.conf 中,并在需要时重用。自动生成证书的命令如下
# 生成域名的证书
acme.sh --issue --dns dns_dp -d domain_name
如果是aliyun 的域名参考 acmesh-official/acme.sh/wiki/dnsapi#11-use-aliyun-domain-api-to-automatically-issue-cert
export Ali_Key="LTAI***w"
export Ali_Secret="EW6N***o"acme.sh --issue --dns dns_ali -d example.com服务商变更
指定服务商
acme.sh --issue .... --server zerossl设置默认的服务商
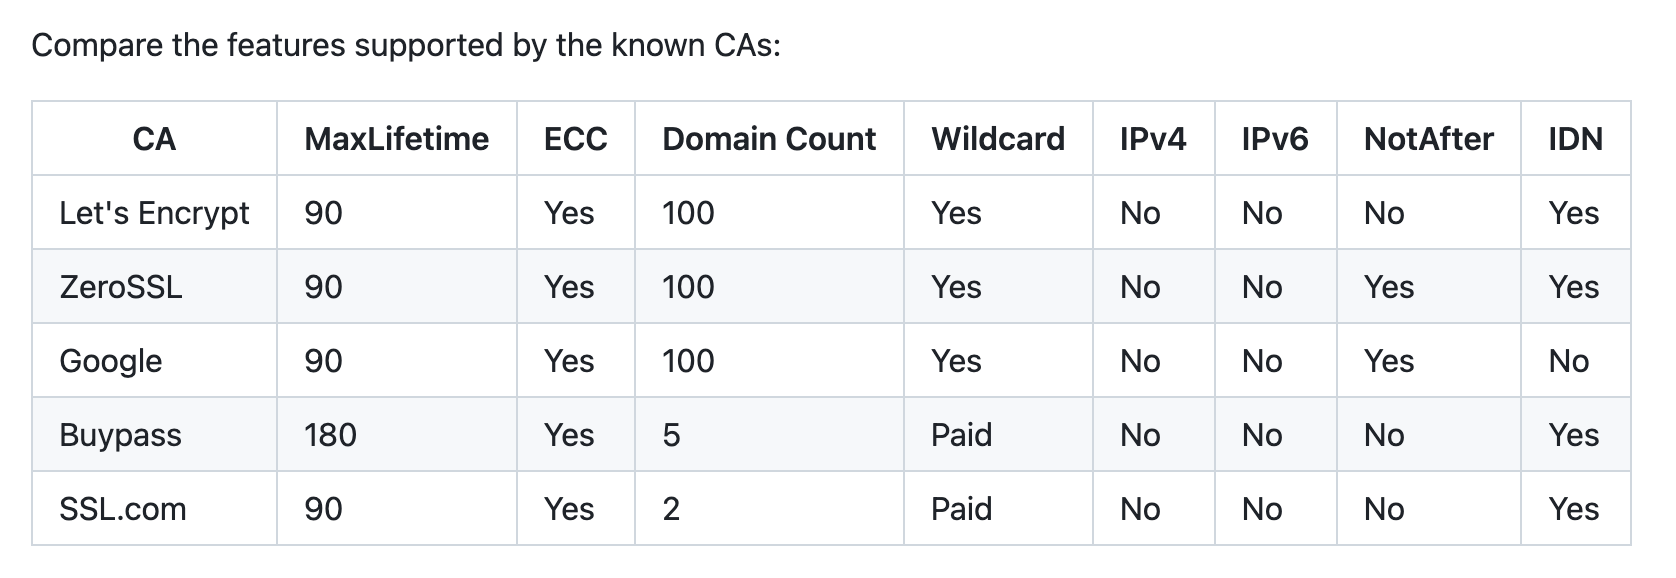
acme.sh --set-default-ca --server letsencrypt当前默认的服务商是 ZeroSSL, 当前支持的服务商清单 CA · acmesh-official/acme.sh

当前服务商别名如下 : Server · acmesh-official/acme.sh
| Short Name | ACME server URL | Usage Wiki |
| letsencrypt | [https://acme-v02.api.letsencrypt.org/directory](https://acme-v02.api.letsencrypt.org/directory) | N/A |
| letsencrypt_test | [https://acme-staging-v02.api.letsencrypt.org/directory](https://acme-staging-v02.api.letsencrypt.org/directory) | N/A |
| buypass | [https://api.buypass.com/acme/directory](https://api.buypass.com/acme/directory) | [BuyPass.com CA](https://github.com/acmesh-official/acme.sh/wiki/BuyPass.com-CA) |
| buypass_test | [https://api.test4.buypass.no/acme/directory](https://api.test4.buypass.no/acme/directory) | [BuyPass.com CA](https://github.com/acmesh-official/acme.sh/wiki/BuyPass.com-CA) |
| zerossl | [https://acme.zerossl.com/v2/DV90](https://acme.zerossl.com/v2/DV90) | [ZeroSSL.com CA](https://github.com/acmesh-official/acme.sh/wiki/ZeroSSL.com-CA) |
| sslcom | [https://acme.ssl.com/sslcom-dv-rsa](https://acme.ssl.com/sslcom-dv-rsa) | [SSL.com CA](https://github.com/acmesh-official/acme.sh/wiki/SSL.com-CA) |
| [https://dv.acme-v02.api.pki.goog/directory](https://dv.acme-v02.api.pki.goog/directory) | [Google Public CA](https://github.com/acmesh-official/acme.sh/wiki/Google-Public-CA) | |
| googletest | [https://dv.acme-v02.test-api.pki.goog/directory](https://dv.acme-v02.test-api.pki.goog/directory) | [Google Public CA](https://github.com/acmesh-official/acme.sh/wiki/Google-Public-CA) |
续期
一般情况下无需手动续期, 所有的证书会每 60 天自动续期
然而你可以强制签发证书
acme.sh --renew -d example.com --force或者 ECC 证书
acme.sh --renew -d example.com --force --ecc安装
自动进行安装到指定目录, 如果带有 reloadcmd , 则会自动在更新完毕之后自动执行 reload 命令来让服务器生效
Mac 下成功
安装文件
此目录示例基于 arm 芯片的mac
acme.sh --install-cert -d domain_name --dns dns_dp \
--key-file       /opt/homebrew/etc/nginx/cert.d/domain_name.key  \
--cert-file /opt/homebrew/etc/nginx/cert.d/domain_name.pem \
--reloadcmd "nginx -t && nginx -s reload"
nginx 配置
server {
    ...
    ssl_prefer_server_ciphers on;
    ssl_certificate cert.d/domain_name.pem;
    ssl_certificate_key cert.d/domain_name.key;
    ssl_session_timeout 5m;
    ssl_ciphers HIGH+kEECDH+AESGCM:HIGH+kEECDH:HIGH+kEDH:HIGH:!aNULL;
    ssl_protocols TLSv1 TLSv1.1 TLSv1.2;
    ...
}
RHEL 成功
独立域名配置并重启 nginx
acme.sh --install-cert -d domain_name --dns dns_dp \
--keypath       /etc/nginx/cert.d/domain_name.key  \
--fullchainpath /etc/nginx/cert.d/domain_name.pem \
--reloadcmd "nginx -t && nginx -s reload"
这里如果是泛域名解析安装的时候需要对 * 进行特殊处理
acme.sh --install-cert -d \*.domain.com --dns dns_ali \
    --keypath       /etc/nginx/cert.d/\*.domain.com.key  \
    --fullchainpath /etc/nginx/cert.d/\*.domain.com.pem \
    --reloadcmd "nginx -t && nginx -s reload"
nginx 配置(ECC)
// nginx  配置
server {
    ...
    ssl_certificate cert.d/domain_name.pem;
    ssl_certificate_key cert.d/domain_name.key;
    ssl_session_timeout 5m;
    ssl_protocols TLSv1 TLSv1.1 TLSv1.2;
    ssl_ciphers HIGH+kEECDH+AESGCM:HIGH+kEECDH:HIGH+kEDH:HIGH:!aNULL;
    ssl_prefer_server_ciphers on;
    ...
}
对于需要取消 rhel 的自动更新证书位置需要打开相应文件夹中的域名配置文件将以下几个参数置空即可
# /root/.acme.sh/domain_name_ecc
...
# 置空以下几个选项, 其中是指的配置的证书的实际位置以及相关的命令
Le_RealCertPath=''
Le_RealCACertPath=''
Le_RealKeyPath='/etc/nginx/cert.d/domain_name.key'
Le_ReloadCmd='__ACME_BASE64__START_bmdpbnggLXQgJiYgbmdpbnggLXMgcmVsb2Fk__ACME_BASE64__END_'
Le_RealFullChainPath='/etc/nginx/cert.d/domain_name.pem'
验证结果

查看已经安装的证书的信息
证书中包含
- dns 信息
- api 证书签发服务器
- 证书续期时间
- 证书自动更新到 nginx 的位置
[root@centos7 ~]# acme.sh --info -d wulicode.com
DOMAIN_CONF=/root/.acme.sh/wulicode.com/wulicode.com.conf
Le_Domain=wulicode.com
Le_Alt=no
Le_Webroot=dns_dp
Le_PreHook=
Le_PostHook=
Le_RenewHook=
Le_API=https://acme.zerossl.com/v2/DV90
Le_Keylength=2048
Le_OrderFinalize=https://acme.zerossl.com/v2/DV90/order/A-p4kcCkQfiKvCfOcU_isA/finalize
Le_LinkOrder=https://acme.zerossl.com/v2/DV90/order/A-p4kcCkQfiKvCfOcU_isA
Le_LinkCert=https://acme.zerossl.com/v2/DV90/cert/tEQ887OFnU_UqhQ5hFDcEA
Le_CertCreateTime=1696761347
Le_CertCreateTimeStr=2023-10-08T10:35:47Z
Le_NextRenewTimeStr=2023-12-07T10:35:47Z
Le_NextRenewTime=1701858947
Le_RealCertPath=
Le_RealCACertPath=
Le_RealKeyPath=/etc/nginx/conf.d/wulicode/wulicode.com.key
Le_ReloadCmd=nginx -t && nginx -s reload
Le_RealFullChainPath=/etc/nginx/conf.d/wulicode/wulicode.com.cer
FAQ
www 域名和 @ 域名 不通用
在测试的过程中发现,
www和@是两个不同的域名

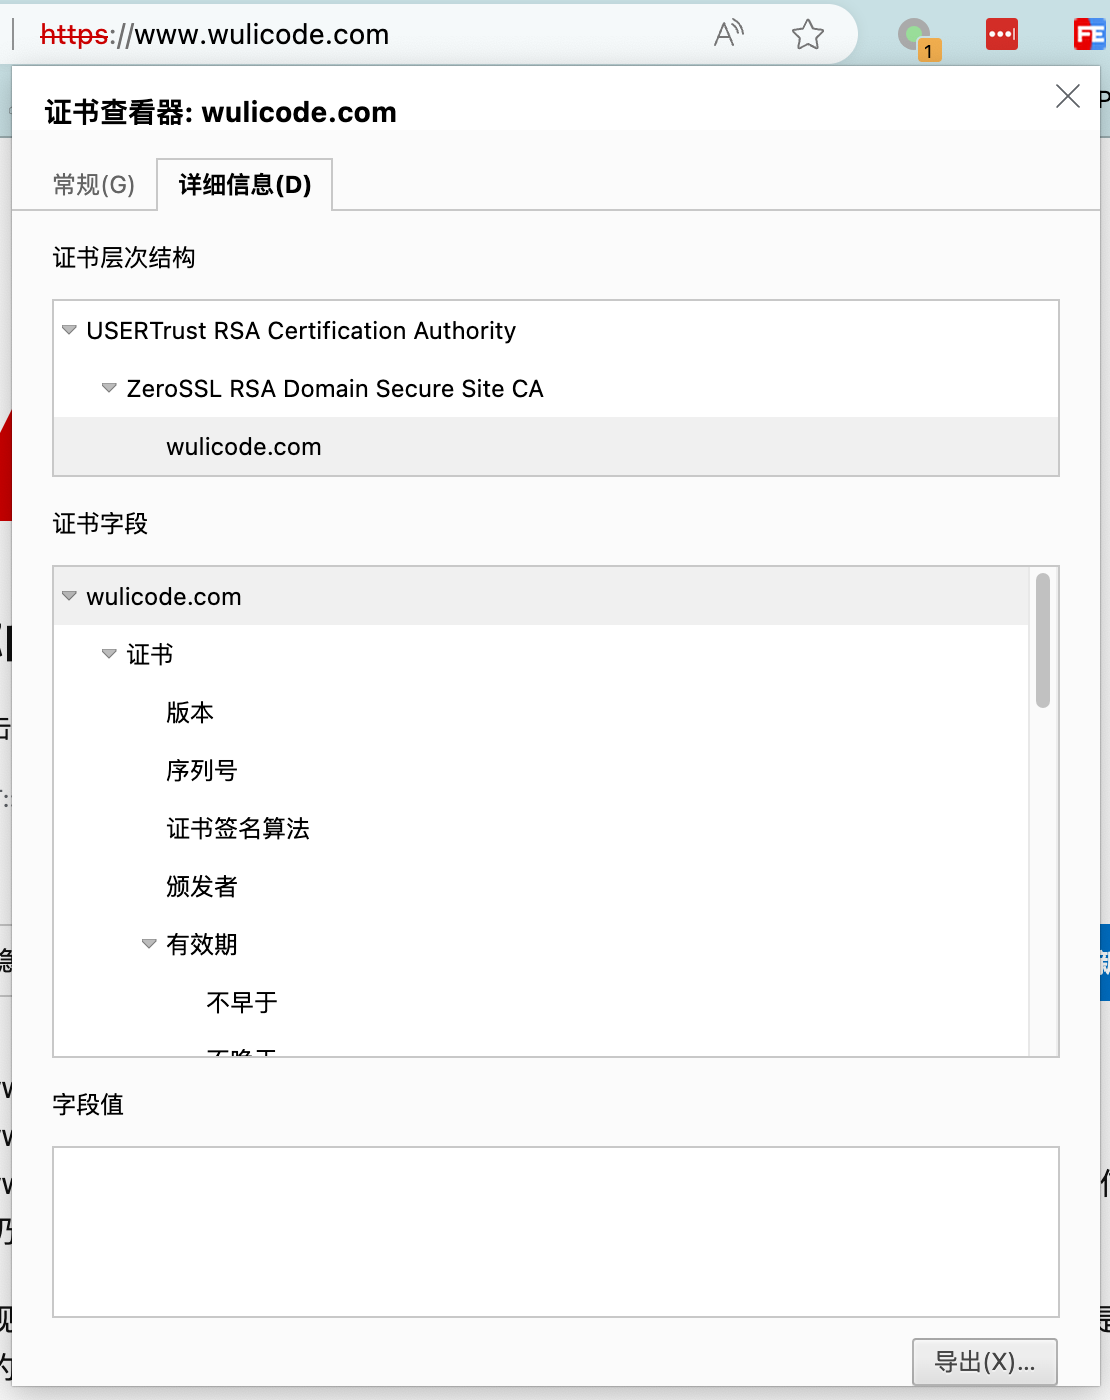
使用 zerossl 无法签发证书
Error, can not get domain token "type":"dns-01","url":"https://acme.zerossl.com/v2/DV90/chall/vOhhkai3nxopCFgfcsoiYw","status":"invalid","error":{
切换服务商到 letsencrypt, 可能因为联通性问题, 无法访问到 zeroSsl 的服务器.
更新记录
2024年01月10日
- 移除国内源的加速, 可能存在风险问题
